Loft conversions are a popular way to add extra living space and value to your home, especially in urban areas where expanding outward may not be an option. Among the various types of loft conversions, the rear dormer is one of the most common and practical solutions for homeowners looking to maximize both space and natural light.
A rear dormer extension creates additional headroom by extending the back of your roof vertically, resulting in a spacious, full-height room. This type of conversion is particularly popular in terraced and semi-detached homes, making it an ideal choice for those looking to transform their loft into a usable bedroom, office, or living area. Beyond adding valuable square footage, a well-executed rear dormer can enhance the overall value of your property and make it more attractive to future buyers.
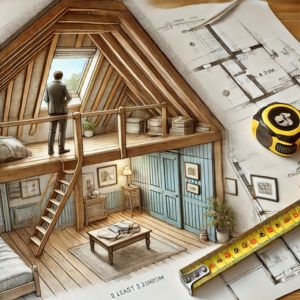
Step 1: Assess Your Space and Feasibility
Before diving into plans for a rear dormer loft conversion, the first step is to evaluate your loft’s space and structure to ensure it’s suitable for conversion. Here are the key considerations:
Headroom: The height of your loft is crucial. Ideally, you should have at least 2.2 meters (7 feet) of headroom at the highest point. If your loft doesn’t meet this requirement, structural alterations like raising the roof may be necessary, which could increase costs and complexity.
Structural Integrity: It’s important to assess the existing structure of your home, including the strength of your roof and floor joists. A structural engineer can help determine if the current setup can support a rear dormer extension or if additional reinforcements are needed.
Staircase Access: Converting your loft will require a safe and compliant staircase. Consider where it can be installed without losing too much space from your existing rooms.
Check Local Regulations and Permitted Development Rights
In many cases, rear dormer conversions fall under permitted development rights, meaning you might not need full planning permission as long as the dormer meets certain criteria, such as:
- The dormer doesn’t exceed the height of the existing roof.
- It is set back at least 20cm from the original eaves.
- The total additional volume created by the dormer is under 40 cubic meters for terraced houses and 50 cubic meters for semi-detached and detached houses.
However, if your property is located in a conservation area or is a listed building, more restrictions may apply, and you will likely need to submit a formal planning application.
Transform Your Home with a Rear Dormer Loft Conversion!
Ready to enhance your living space? Explore our specialized services for rear dormer loft conversions and discover how we can help you maximize your home’s potential.
Contact us today to schedule a consultation and take the first step towards your dream loft!
Step 2: Planning Permission
Whether or not you need planning permission for your rear dormer loft conversion depends largely on the size and location of the proposed extension. In most cases, a rear dormer falls under permitted development rights, meaning you won’t need to apply for planning permission, provided the dormer meets certain criteria:
- The dormer does not extend beyond the plane of the existing roof slope on the front of the house.
- It does not exceed the height of the highest part of the roof.
- It is set back at least 20cm from the roof’s eaves.
- The dormer and any other roof additions do not exceed 40 cubic meters for terraced houses and 50 cubic meters for semi-detached or detached homes.
- The materials used are similar in appearance to the existing house.
However, planning permission will be required if your property is located in a conservation area, is a listed building, or if the design exceeds the limits of permitted development. Additionally, certain councils may have local restrictions that require you to submit a planning application.
How to Apply for Planning Permission (if necessary):
1.Consult an Architect or Planning Consultant: Before submitting an application, it’s essential to work with a professional who can confirm if planning permission is required and guide you through the process.
2.Prepare Your Documents: You’ll need detailed architectural drawings of the proposed rear dormer, including floor plans and elevations, as well as supporting documents like a site location plan and a design and access statement (if required).
3.Submit the Application: Planning applications are typically submitted online through your local council’s website. The process includes submitting your drawings, filling out forms, and paying a fee (usually between £200 and £500).
4.Wait for a Decision: The council will review your application, and in most cases, a decision is made within 8 weeks. During this time, your neighbors may be informed of the proposal and given a chance to raise objections.
5.Approval and Conditions: If approved, you may begin construction, but be mindful of any conditions attached to the approval, such as materials to be used or working hours.
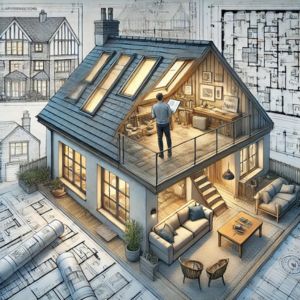
Step 3: Design and Layout
Once you’ve established whether planning permission is required, the next step is to collaborate with an architect to design a dormer that meets your needs, preferences, and budget. A well-designed rear dormer can dramatically enhance both the interior space and the exterior appearance of your home.
Key Design Considerations:
Maximizing Natural Light: Incorporating large windows or even skylights can significantly improve the amount of natural light in your loft, making it feel more open and inviting. Dormer windows offer a great opportunity to bring light into previously dark spaces.
Ventilation: Ensure that your loft conversion includes proper ventilation. A well-ventilated loft is essential for maintaining a comfortable temperature and preventing issues like condensation and dampness. Options include opening windows, roof vents, or mechanical ventilation systems.
Aesthetic Harmony: The design of the rear dormer should complement the existing architecture of your home. You’ll want to choose materials and finishes that blend seamlessly with your property’s exterior, particularly if you’re in a conservation area.
Space Optimization: Work with your architect to make the most of the new space. Consider how you plan to use the loft—whether as a bedroom, home office, or living area—and design accordingly. Built-in storage solutions and careful placement of fixtures like radiators can help you maximize the usability of the room.
Budget and Costs: Balancing your design preferences with your budget is essential. Discuss with your architect the most cost-effective ways to achieve the look and functionality you desire, from materials to layout.
Create a Functional Layout
Once you’ve decided on the general design of the dormer, consider the internal layout. Work with your architect to create a floor plan that makes the best use of the space. This includes:
Positioning the Staircase: The staircase should be located in a way that minimizes the impact on the rooms below, while still providing easy access to the new loft space.
Room Layout: Depending on your needs, you can divide the loft into multiple rooms or create one large open space. Be mindful of the placement of windows, doors, and any necessary structural supports.
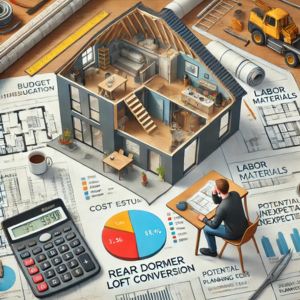
Step 4: Budgeting and Costs
A rear dormer loft conversion can be a significant investment, but it’s important to plan your budget carefully to avoid unexpected expenses. The overall cost of the project will depend on the size of the dormer, materials used, labor costs, and any additional structural work that might be required.
Key Budget Factors:
1.Labor and Materials
- Labor Costs: The cost of labor will vary depending on your location and the complexity of the project. In the UK, rear dormer loft conversions typically cost between £30,000 and £50,000 for a standard conversion, including labor and materials.
- Materials: The cost of materials, such as roof tiles, windows, and insulation, will significantly affect your budget. If you’re using high-end materials like timber windows or slate tiles, the cost will rise. Consult with your architect to choose materials that fit both your aesthetic and budget needs.
2.Planning Fees
- If your project requires planning permission, factor in the fees for submitting your application. These fees typically range from £200 to £500, depending on your local council. Additionally, you may need to budget for professional services like architectural drawings and structural engineer reports, which can cost between £1,000 and £3,000.
3.Building Regulations and Inspections
- Even if your dormer conversion doesn’t require planning permission, you’ll still need to comply with building regulations. These regulations cover structural safety, fire safety, and energy efficiency, among other factors. There will be costs associated with inspections and obtaining completion certificates, which could be around £500 to £1,000.
4.Unforeseen Structural Work
- It’s wise to include a contingency in your budget for unforeseen structural work. For example, if your roof structure is weaker than anticipated, you may need to reinforce it, adding to the overall cost. Typically, a 10-15% contingency is recommended for unexpected expenses.
5.Interior Finishes
- Don’t forget to budget for the interior finishes, including flooring, plastering, painting, and any furniture or built-in storage. These costs can vary greatly depending on your tastes, but typically range from £3,000 to £10,000.
Managing Costs
To keep costs manageable, it’s essential to get detailed quotes from several builders and to work with an architect who understands your budget limits. Keep in mind that while cutting corners might seem tempting, quality workmanship and materials will save you from costly repairs in the long run.
Transform Your Home with a Rear Dormer Loft Conversion!
Ready to enhance your living space? Explore our specialized services for rear dormer loft conversions and discover how we can help you maximize your home’s potential.
Contact us today to schedule a consultation and take the first step towards your dream loft!
Step 5: Choosing the Right Builder
Selecting the right contractor for your loft conversion is a critical step in ensuring the project runs smoothly, on time, and within budget. Not all builders specialize in loft conversions, so it’s important to choose a contractor with the right experience and qualifications to carry out the work to a high standard.
Tips for Selecting a Reliable Contractor:
- Experience in Loft Conversions: When vetting potential builders, prioritize those with proven experience in loft conversions, specifically rear dormers. Loft conversions have unique challenges, including structural changes and ensuring compliance with building regulations, so expertise is essential.
- Check Qualifications and Accreditation: Ensure that the builder or construction company is registered with a recognized industry body, such as the Federation of Master Builders (FMB) or TrustMark. These accreditations indicate that the contractor meets industry standards and is committed to quality workmanship.
- Review References and Portfolio: Always ask for references and look at examples of their previous work. A reputable contractor will have no problem providing you with customer testimonials and showcasing completed loft conversions. Take the time to speak with past clients about their experience.
- Insurance and Liability Coverage: Make sure your chosen contractor has public liability insurance, which covers any potential damages to your property or third parties during the work. Additionally, ask about warranties on the work and the materials used, giving you peace of mind in case any issues arise after the project is complete.
- Get Detailed Quotes: Request detailed, written quotes from multiple builders to compare costs and what is included. The quote should clearly outline the price for materials, labor, timelines, and any contingencies. Be wary of quotes that seem too good to be true—they may be cutting corners or omitting essential parts of the project.
- Communication and Professionalism: Choose a contractor who communicates clearly, listens to your needs, and is transparent about any potential challenges or delays. Strong communication is key to ensuring that the project progresses smoothly and that any issues are addressed promptly.
By following these steps, you can confidently choose a builder who is skilled, trustworthy, and committed to delivering a successful loft conversion.
Step 6: The Construction Process
Once you’ve selected your builder and all the necessary planning and design stages are complete, the construction phase can begin. Understanding the typical timeline and process can help you manage expectations and plan for any disruptions during the work.
Overview of the Construction Phases:
1.Initial Preparations and Scaffolding: Before any major work begins, the construction team will set up scaffolding around your property to provide safe access to the roof. This usually takes 1-2 days, depending on the complexity of the project.
2.Structural Work and Roof Alterations: The first significant phase of the loft conversion involves altering the existing roof structure to accommodate the rear dormer. This includes:
Removing parts of the roof where the dormer will be installed.
Reinforcing or replacing joists and structural supports to ensure the new space is strong enough to support the additional weight.
This phase typically takes 2-3 weeks, depending on the scale of the work.
3.Installing the Dormer Frame: Once the structural work is complete, the frame for the rear dormer is built and installed. This includes adding the dormer walls, roof, and windows. During this phase, the loft starts to take shape, and you’ll get a clearer sense of the space.
This part of the process can take 1-2 weeks.
4.Insulation, Plumbing, and Electrical Work: Once the structure is in place, the builders will install insulation, ensuring that the loft is energy-efficient and complies with building regulations. If your loft conversion includes a bathroom or additional lighting, the plumbing and electrical work will be completed during this stage.
This phase typically takes 1-2 weeks, depending on the complexity of the installations.
5.Internal Finishes: After all the structural and technical work is done, the focus shifts to finishing the interior of the loft. This includes:
Plastering the walls.
Installing flooring.
Adding fixtures like radiators, lighting, and built-in storage.
Painting and decorating.
This phase can take anywhere from 1-3 weeks, depending on the level of customization and finishes you’ve chosen.
Managing Potential Disruptions
While the construction team will do their best to minimize disruptions, some level of inconvenience is unavoidable during a loft conversion. Here are some potential issues and how to manage them:
Noise and Dust: Construction work can be noisy and messy. If possible, consider staying elsewhere during particularly disruptive stages of the project. If you need to stay in your home, the builders can take steps to seal off work areas and reduce the spread of dust.
Access to Your Home: The scaffolding and construction work may limit access to parts of your home, particularly if the staircase leading to the loft is being installed. Discuss with your builder how they plan to manage this and what impact it will have on your day-to-day life.
Weather Delays: Since rear dormer conversions involve work on the roof, bad weather can cause delays. Ensure your builder includes potential weather-related setbacks in their timeline, and ask about any protective measures they will take during the construction.
Safety Precautions: The builders should follow all necessary safety procedures, including keeping the site clean and safe, particularly if you have children or pets in the house.
By understanding the construction timeline and preparing for potential disruptions, you can manage the process more effectively and ensure that your loft conversion progresses as smoothly as possible.
Step 7: Final Inspection and Approval
As the construction of your rear dormer loft conversion nears completion, the final step is to ensure that all work complies with building regulations and that the necessary inspections are carried out. This is critical to guarantee the safety, durability, and legality of your new living space.
Ensuring Compliance with Building Standards
Throughout the construction process, your builder and architect should work according to the latest building regulations, which cover everything from structural integrity to fire safety and energy efficiency. These regulations ensure that your loft conversion is safe for occupancy and meets environmental standards. Key areas of compliance include:
- Structural safety: Ensuring that the roof and floor can support the new space.
- Fire safety: Installing fire doors, smoke alarms, and creating a safe exit route.
- Insulation: Adequate insulation is required to make the space energy-efficient and comfortable.
Final Inspections and Completion Certificates
- Book a Final Inspection: Once the building work is finished, your local council or an approved inspector will conduct a final inspection of the loft conversion. This involves checking that all work meets the required standards, including structural elements, electrics, plumbing, and fire safety measures.
- Obtain Completion Certificates: After passing the inspection, you will be issued a completion certificate, confirming that the work complies with building regulations. This document is crucial for selling or remortgaging your property in the future, as it proves the legality and safety of the conversion.
- Resolve Any Issues: In the rare case that the inspector identifies any problems, your builder should address them before the certificate can be issued. Make sure all final details are resolved to avoid any future legal or safety concerns.
The completion certificate is a critical part of the process, as it not only confirms that the loft conversion is up to standard but also increases the value of your home.
Conclusion
A rear dormer loft conversion is a fantastic way to add space, functionality, and value to your home. By extending your roof, you can transform an unused attic into a bright, airy room that suits a wide range of purposes, from an extra bedroom to a home office.
The benefits of a rear dormer loft conversion include:
- Increased space: Maximize the square footage of your home without encroaching on your garden.
- Added value: A well-executed loft conversion can increase the value of your property by up to 20%.
- Enhanced aesthetics: A dormer can be designed to blend seamlessly with your home’s architecture while offering stunning views and more natural light.
To ensure the process goes smoothly, it’s important to start planning early. From obtaining the necessary permissions to choosing the right builder, early preparation can prevent delays and unexpected costs. Whether you’re looking to create a luxurious master bedroom, a peaceful study, or a playroom for your family, planning ahead is the key to success.
Transform Your Home with a Rear Dormer Loft Conversion!
Ready to enhance your living space? Explore our specialized services for rear dormer loft conversions and discover how we can help you maximize your home’s potential.
Contact us today to schedule a consultation and take the first step towards your dream loft!